Logs 'n Dogs
Windows and Doors
"Is there any way I can talk you out of that round window idea?"
So many times during our project, we congratulated ourselves on having the foresight to buy most of our windows and doors used before we began the project. Our doors were large heavy slab doors that came from a commercial building that was being remodeled. It took both of us to lift one. Our windows came secondhand, without frames of any kind. This didn’t bother us at the time because we thought constructing our own frames would be simple.
There’s no counting the number of times we’ve begun a sentence about our house project with the words “In hindsight…” Stubbornness prevailed over reason to the bitter end.
Having the windows before we designed the house limited our design somewhat. Also, by the time we got around to using them, the seals had broken in some of the windows, causing them to fog, and making them useless. Finally, constructing custom window frames for so many windows was a chore near the end of the project that tested our patience.
All that said, we liked the end result. Our windows and doors weren’t fancy, but they suited the simple character of the house.
Cutting out Window and Doors
Because we had anticipated the locations of windows and doors as we built our log walls, we had been careful not to install rebar spikes in areas where we would be using a chain saw to cut openings in the walls. This made cutting the openings relatively simple.
To make sure our openings were square and level, we nailed a 2 x 4 template on the wall at the location of each opening before cutting. We cut through one log at a time and removed it before moving on to the next log, being careful to avoid being struck by log pieces that fell from window openings up high.
With window and door openings cut out, the shell began to look like a house.


Casings, Frames and Hangers
We constructed casings around each cut opening in the log walls with 1 x 10’s.
On the upper portion of the house, we had planned to have quarter-round windows in the gabled ends – two on the front, and two on the side. For these, it was necessary to make special curved casings. We purchased sheets of ½ inch plywood and cut it in strips the length of the curved side of the windows. We scored one side of each plywood strip by making a series of parallel cuts with the circular saw that were about 1 inch apart but didn’t cut entirely through the plywood. These partial cuts allowed the plywood to bend easily. Finally, we glued the plywood strips together and bent them into the curved shape of the window while the glue was still wet. After clamping them in place and drying for several days, the curved casings were ready to be used.
For windows that needed to be openable, we made frames using 2 x 2’s, with a channel routed out for the glass to be inserted into. We installed piano hinges along the tops of the openable windows, so that they could swing out like awnings.
On the inside and outside of the log walls, we finished off the windows and doors with a fascia frame of 1 x 6 rough-sawn cedar boards.
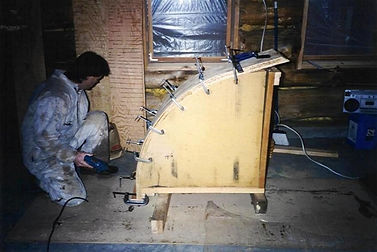

Making the casings for our quarter-round windows.