Logs 'n Dogs
The Basics: Building Method Overview
Piers and Poles – A Different Way of Building
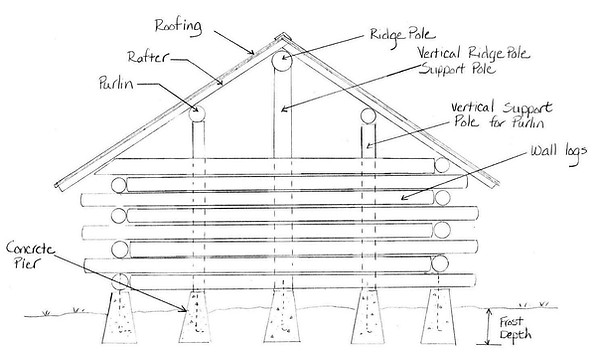
Our building method differs from the structural approach used in a regular “stick frame” house. In a traditional framed house, walls are the main structural elements that support upper stories and ultimately the roof. Our log home used a post and pier method where concrete piers and vertical (upright) logs provide the primary support for the roof instead of walls framed with dimensional lumber.
Basic Structural Concept
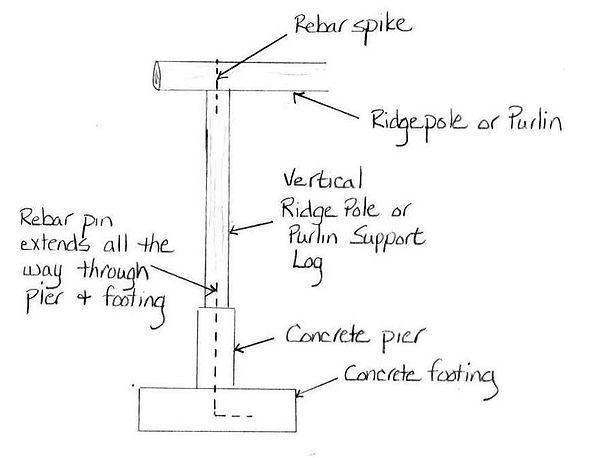
Foundation and Structural Logs
This means that the horizontal wall longs the our structure don't carry much weight. The main "structural logs" in our home were not the wall logs, but rather the vertical support logs, along with the ridge pole and the purlins. Most of the weight of the roof and our upstairs floor was borne by the vertical logs on the inside of the house. Since logs tend to shrink in diameter, but not much in length, and since the main structure was supported by upright logs rather than horizontal logs, there was little risk of the structure settling over time. The roof and flooring has stayed true and straight.
Log Wall Types
There are a variety of methods that can be used to construct log home walls. Some methods are very time intensive; some are structurally stronger than others; some require “chinking,” or filler material between the logs; some allow logs to rot more quickly than others. We describe several common log-building methods below, and explain why chose the method we did.
Full Scribe Method
The full scribe method is a time-intensive process to carve the entire length of the bottom side of each log so that it exactly fits the log beneath it.
A “scribe” is a tool that draws an outline of the top of one log onto the bottom of the next log to be set. Once the log above has been scribed it is removed and a rounded channel is carefully carved along the base of the top log, either with a chisel, or with painstaking chainsaw work.

Full Scribe Logs
("Scandanavian Chinkless Method")
After a channel is carved in the log, it is set over the log underneath and high points are identified. The top log is then removed, more chiseling or chainsaw work is done to remove additional wood from the channel, and then it is set again over the bottom log to see how it fits. The process continues until the top log fits snugly against the bottom log, with no gaps.
You can identify the high points in the channel of the top log by wetting the bottom log. When the top log is placed over the bottom log, water will be transferred from the surface of the bottom log to the locations where the top log touches it. You can then chisel or carve out those locations on the top log.
Advantages
Log homes constructed with the full scribe method require no chinking (or filler material between the logs) and are considered by many to be the most attractive of log homes. When done right, a full scribe method home can be tight and free of drafts.
Disadvantages
Full scribe method homes are time intensive. Logs used for this building method should be seasoned for at least a year to ensure they are done shrinking, warping, and twisting before they are scribed and placed. To construct a full scribe log structure properly, hours of scribing and carving is required for each log.
Another disadvantage of the full scribe method is the tendency of wood surfaces to “wick” water. If you place two boards together outdoors in a moist environment for a few days and then take them apart, you will find the surfaces where they have touched are moist. This same capillary action draws moisture between logs in a full-scribe log home. Consequently, a home constructed with a full-scribe method might rot faster than other methods with less direct contact between the logs. It may be wise to consider using tree species with high rot resistance, such as cedar, for this construction method.
V-Notch Method
There is another construction method that is sometimes used to achieve the look of a full scribe method without the heavy time investment. This method is different from the full-scribe technique described above; however, there is no visually apparent difference after construction is complete.
True to its name, the V-notch method involves cutting a “V” shaped notch with a chain saw, lengthwise along the bottom of each log. The tops of the inverted “V” then rest on the log below. Each log is v-notched to within three inches or so of the end, and the ends are saddle notched as described below.
Advantages
The primary advantage of the V-notch method is a “chinkless” look with minimal time investment.
Disadvantages
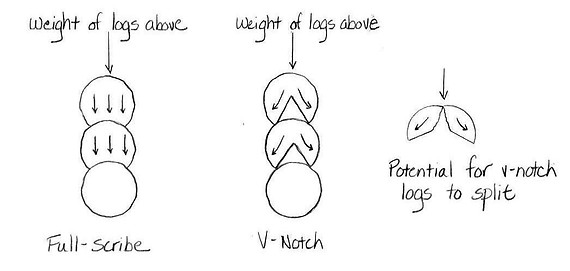
With the V-notch method, there is no uniform weight distribution along the length of the logs, and splits or “checks” are likely to occur. Over time, the weight of the log and the wall logs above it can force the checks wider and wider until occasionally, a log may split in half. Before selecting this method, one should weigh the potential for this against the understanding that it would be extremely difficult, if not impossible, to replace a log in the middle of a wall if one should split in the future.
Logs intended for this construction technique should be seasoned for at least a year to prevent shrinking, warping and twisting after they are set in place.
Weight Distribution in Log Walls using V-Notch Technique
Saddle Notch Method
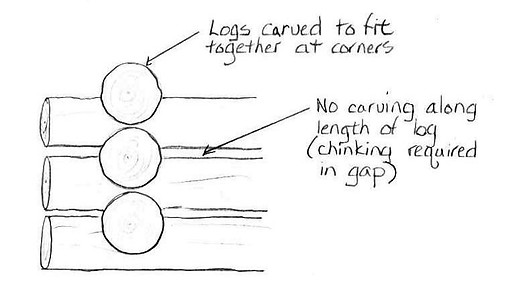
The saddle notch technique involves carving or notching logs only at the corners of the structure. Notching is performed in the same manner as the full scribe method described above, but without carving out the entire length of the bottom side of each log. Since the saddle notch method only fits logs precisely together at the corners, chinking is required between the logs elsewhere.
Saddle Notch Method
Advantages
The saddle notch method is somewhat less time consuming than the full scribe method.
Disadvantages
Many of the same disadvantages described above for the full scribe method hold true for the saddle notch method. Again, for this method, logs must be completely seasoned for at least a year to prevent shrinking, warping and twisting after they are notched. The tendency for moisture to wick between wood surfaces where the logs are notched at the corners may also be a concern. Chinking is required except at the corners.
Butt Method
The butt method gets its name from the way corners are created. Instead of notching logs at the corners, logs are simply butted into one another.
Butt Method

Logs are not carved at all in the butt method. Instead they remain whole, and therefore retain all of their structural strength. To connect the logs together using the butt method, iron rebar spikes are driven through each log into the log beneath.
This method requires chinking between the logs.
Advantages
The butt method is the technique we selected for our own home.
Of the techniques we researched, we determined that the butt method would yield the strongest structure. And, because the water-wicking surface area between logs is minimized with this method, there is less opportunity for rot to occur. The butt method is also less time-intensive than the full scribe and saddle notch method.
While log seasoning is recommended, it is not absolutely necessary with the butt method. We seasoned some of our logs for a year, but cut, peeled, and placed others within a span of 3 months with no difficulties. The rebar spikes that held the logs together also prevented warping and twisting of the logs as they seasoned.
Disadvantages
Chinking is required between the logs.
Picking the “Right” Log Wall Construction Type
There are many opinions, but we don't believe there is a single right or wrong way to construct log walls. The "butt" method worked fine for us, but others might find a different method suits their taste and time requirements.
The photographs on this site are of our own build, and therefore show the butt method of log wall construction. However, any log placing and fastening method should work with the general construction process outlined on these pages. The methods described for providing a foundation, putting up structural (vertical) logs, putting the roof on, etc, are the same.