Logs 'n Dogs
Selecting and Handling the Logs
"Just remember, honey, you're smarter than that log!"
Our property had useable timber, so we didn't need to purchase logs. But whether logs are delivered to the site, or cut on site, a lot of time and effort is spent moving them around and preparing them.
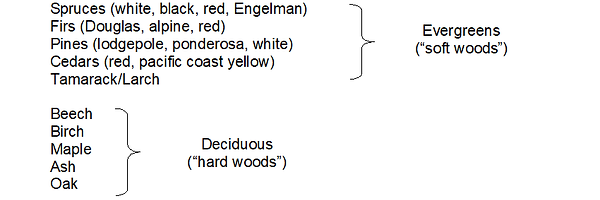
Types of Trees
Cedar and redwood provide outstanding rot resistance but can be expensive and may not be readily available in your area. We encountered many “armchair log home builders” who insisted that only cedar should be used. With the building method we chose, the species of trees didn’t matter as much as choosing logs that were long enough and relatively straight. Our property contained mostly lodgepole pine, with a few scattered red fir and tamarack. We used what we had.
In some areas, only certain types of wood may be allowed by your local building department for log homes, so make sure you check.
Some woods that are commonly used for log home construction:
Where to Find Logs
Our homesite was forested, and we were lucky to have enough tall straight lodgepole pine trees of consistent diameter to use for our house. If you don’t have timber available on-site, here are a few things we learned about how to acquire logs:
-
If you live in an area with a timber-based economy, finding logs is not difficult. If not, be prepared for some phone work, or a road trip to find logs. Lumber mills are one source, however other options may be less expensive and give you more control in selecting your logs. For example, buying logs from the Forest Service, working with private timber landowners, or striking a deal with a contract logger.
-
A contract logger buys and harvests timber from landowners, and then sells the logs to a mill. You may be able to arrange to view the timber stand the logger plans to harvest next, and place ribbons on the specific trees you want to buy. Be prepared to pay the logging contractor slightly more than the mill is paying for logs. There’s no incentive for the logger to go through the trouble of sorting and selling trees to you otherwise.
-
Purchased logs need to be hauled to building site, usually over public roads. We learned that 40-foot-long logs are usually not difficult to find and transport. Logs up to 65 feet in length can often be hauled on rural roads without requiring a special permit. But logs longer than this are more difficult, and therefore more expensive, to transport. Special pole haulers can accommodate logs up to 120 feet. For a price.
Selecting and Cutting Logs
Desirable Log Characteristics
We looked for trees that were straight, with as little taper as possible (diameter changing only about an inch or so every 10 feet or so).
We selected roughly the same diameter logs (give or take a few inches) for all the walls and vertical supports in our house, except for the central ridge pole. For this, we picked a massive larch tree that was about twice the diameter of our other logs.
Number of Logs Needed
We began cutting our trees with just a rough estimate of how many we needed. We had an idea of the length and diameter of the logs we would be using, and also had our plans drawn to the point where we had identified the size (footprint and height) of our house.
For a rough estimate, we determined how many logs it would take to complete one layer around the perimeter and multiplied it by the number of layers we needed to reach our average wall height. We also decided to use logs on the gabled ends of our home, so we guessed at how many this would require and added them to the total. Then we added some more for the vertical logs, ridge pole and purlins we thought we would need. We cut 20 to 30 percent more logs than we thought we would need, thinking it would be better to have extras than not enough. In the end, we didn’t have much left over.

Barney inspects our future ridge pole - a big tamarack tree about 24 inches in diameter.
Cutting Advice
We marked all of our trees with survey ribbon first before cutting any. To make sure we acquired the best trees, we marked about 30 percent more than we planned to cut. When we were done marking the trees we liked, we removed 30 percent of the ribbons from the least desirable trees.
Once leaves have fallen from deciduous trees in the autumn, evergreen trees goes dormant too, and the sap is “down.” We cut our trees in the fall after the sap was down thinking they would be less “gooey” to handle once they were peeled. However, we found that bark sticks tight to the log after the sap is down, so peeling can be a strenuous exercise. See “Preparing Logs” below.
Be Safe!
Limbs and life are more valuable than the price of logs. We should have worn wear protective equipment on head, eyes, hands, and legs. We’re embarrassed that our photos show we were not cautious about this. In hindsight, we were lucky not to have been injured.

Cutting and limbing our logs. Eye protection, leather gloves and chaps would have been a good idea here.
Preparing Logs
Peeling
Leaving the bark on invites insects to nest in and bore through the wood, so logs need to be peeled before they’re used in a home. Before peeling, we skidded our logs to an area where they could be stacked and stored until we were ready to use them.
In our log storage area, we created a peeling “rack” by laying two of our logs parallel to one another, directly on the ground about 15 to 20 feet apart. Then we placed logs to be peeled perpendicularly across these two sacrificial logs. This allowed us to keep the logs we were peeling off the muddy ground. It was also easier to roll them from side to side as we worked.

Barney inspects the peeling rack.
Drawknives and spuds are typical tools for peeling logs:
-
A drawknife is a long blade that is sharp on one side and has handles on both ends. To use it, you sit astride a log, place the blade on the bark in front of you and pull the knife toward you.
-
A spud is a rounded-tip metal blade at the end of a long handle. You use it standing up by placing the blade on the bark and pushing it away from you, similar to the way you would use a push broom.

Drawknife

Spud

Peeling a log.
While we had heard that spuds are preferred because drawknives can gouge the logs, we decided to use both methods for peeling and found there was no discernible difference in the end. Peeling was hard work, and it was a relief to change from the repetitive motion of one tool to another occasionally. Also, we used garden edger/floor scraper tools instead of buying spuds for peeling. We found them cheaper at the garden nursery, and they worked fine. To get under the bark, we just sharpened the edges using a file.
We used floor scraper tools like this instead of spuds to peel our logs.

We intended to cut all of our trees in the fall when the sap was down, to help reduce the amount of moisture in the logs and minimize shrinkage as they season. We did cut most of our trees in the fall and found the bark stuck hard to those trees. Peeling them was a work-out. Much later, we needed to cut several more trees. It happened to be springtime when the sap was up but we didn’t have the luxury of waiting another six months. The bark practically flew off those spring-cut trees. It was so effortless that we almost regretted cutting the others in the fall. The downside, however, was that with the sap up, the spring-cut logs were a sticky mess to handle.
Seasoning
The type of log building method determines whether logs need to be seasoned.
Scribed and Notched Building Methods: For building methods where each log is notched at the end and/or carved along the length to fit snugly together with the logs above and below it, logs need to be seasoned for at least a year. This allows the logs to do all their shrinking and shape changing before they’re carved. If they’re not fully cured, they may shrink and twist after they’re in place – a disaster.
Our Method: We used a building method inspired by a long-time master log home builder in the Pacific Northwest, Skip Ellsworth. Our logs were pinned in place using rebar spikes, so they couldn’t twist as they cured. We planned to chink between the logs, so we didn’t need the logs to fit snugly together along their length. Seasoned logs were not a requirement for this building method, but most of our logs were well-cured by the time we placed them on our walls anyway. Even the green ones that we cut and placed immediately worked fine, though.
As they seasoned, our logs shrunk slightly in diameter, but not in length. Our typical lodgepole pine log diameter was about 10 to 12 inches. We discovered they shrunk about ½ to ¾ inch in diameter as they cured.
We stored the logs in a single layer on racks in the shade, and intended to turn them over once a week for the first two months, and then once a month for the remainder of a year. This would have helped the logs to cure evenly and perhaps reduce the amount of warping and twisting that tends to occurs as they dry. Out of laziness, however, (or maybe just sheer exhaustion after that whole peeling episode) our logs remained piled in the sun, in something of a haphazard manner. We had some slight warping, and a few logs twisted a bit as they seasoned, but we made them work.
A Log Catalog
After our logs were seasoned, we numbered them and created a catalog listing details about each one. Our catalog helped us plan how to use “bad” logs that were a little crooked, tapered, or bent. The really crooked logs were used in walls where we had cutouts for windows and doors, or we placed them on the back of the house where they were less noticeable. The catalog also helped us determine which logs we needed to save for vertical poles and purlins.
First, we used a crayon to number the logs on the cut ends. We also marked the direction of the log’s camber (bow), if it was noticeable, by drawing an arrow on each end, pointing in the direction that the log bowed out. As we numbered and marked each log, we recorded its characteristics in a chart like this:

Moving and Lifting Logs
Logs are heavy! (Duh!) It didn’t take us long to figure out that brute force was not an effective method of moving and lifting our logs. If we didn’t smarten up, back surgeries and other medical expenses would wipe out any cost savings we had hoped to realize by doing it ourselves. So, early on, we had a valuable lesson in simple principles like leverage and balance.
Whenever possible, we used block and tackle, snatch blocks, pulleys, and other simple leverage tools, to lessen the physical effort required to move our logs. To roll logs during peeling, we used a peavy with a long handle for leverage. When we needed to lift or move a log, hanging it from a chain located at a pivot point in the middle allowed us to swing the log around, and raise and lower each end with just hand pressure.

A peavy makes it easy to roll a log.
At the outset, we realized we would need a way to haul logs out of the woods and move them around the building site. We looked for a used four-wheel drive vehicle but couldn’t find one we could afford. So instead we purchased an old milk truck for a couple hundred dollars that had a big, refrigerated box on the back. The refrigerated box came off, and in its place, we hired a local welder to make a steel saddle that could hold a log boom. At the top end of the boom, we attached a chain hoist that we found at a yard sale for $25.
A chain hoist is a mechanical device with gears that move two chains – one fast and one slow. An easy pull on the “fast” chain causes the other chain to move slowly and lift very heavy objects. Chain hoists are used in heavy industries, to lift engines and other heavy machinery. If we hadn’t found the great yard sale chain hoist bargain of the century, a block and tackle set would have served the same function.
Our boom truck contraption not only hauled logs out of the woods, but also gave us a way to lift the logs onto the walls of our house. Since we were always working on the cheap, we also used it to plow snow from our driveway for a number of years.
Obviously, our homemade boom truck is not what most people would consider “standard equipment” for home construction. Any 4-wheel drive vehicle would have worked for dragging logs out of the woods. On the Log Walls page, we show an alternate way to lift logs onto the walls without a boom truck or a crane. The point is, there are plenty of ingenious way to haul and move logs.


With the box removed, Big Red skids a log out of the woods.
With a homemade log boom and chain hoist installed, Big Red helped us drag and lift all of the logs for our house. But we had to be careful not to tip the truck over.
"Big Red" in its glory days, before embarking on a log home building career.