Logs 'n Dogs
Structural Logs:
Ridge Pole, Purlins and Support Poles
"How are we going to get that monster up there?"
Erecting our vertical support logs – the logs that supported our big ridge pole and purlins -- was probably the most challenging part of the entire project. Not because it was physically taxing, but because it took some head-scratching to figure out how to keep the vertical poles upright until they could be secured to the log walls or stabilized at the top with the ridge pole or purlins.
Vertical/Upright Support Logs
Vertical support logs were needed to hold up our main ridge pole and two purlin logs, as well as a smaller ridge pole that extended over our kitchen area. We placed vertical poles underneath each end of the main ridge pole, just inside the perimeter walls, and at two intermediate points between the ends. The purlins and smaller ridge pole were supported underneath with vertical poles in the same manner.
Note that we used our homemade boom truck to lift the support logs, but our alternative plan was to erect temporary lifting poles described in Step 4 next to the location of each vertical support log. Block and tackle sets at the top of each temporary lifting pole would have allowed us to raise each vertical support log upright.
Before erecting the vertical support poles, we first cut each one to the correct length, and carved a sort of curved saddle in the top end where the ridge pole or purlin would later rest.
We also drilled holes into the bottom (large) ends of each vertical log, so that they could slip over the rebar pins that extended up from the concrete piers beneath.

Shaving off a bulge in the wall so the vertical pole will stand straight up and down.
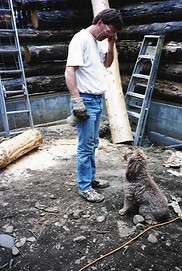
Safety Officer Barney reminds the boss to wear eye protection.
Setting the hole in the end of the vertical pole over the rebar pin sticking up from the pier below.
Meanwhile, Daisy inspects the messy jobsite.

With the vertical support logs adjacent to the perimeter walls in place, the challenge of erecting the rest of the vertical logs in the interior of the structure came next. Since there were no walls for these logs to balance against as they were being erected upright, we used three guy ropes extending from the top of each vertical log to hold it stable until the ridge pole or purlin could be attached at the top.
Again, we handled the interior support logs fairly easily by hoisting them near the middle so that they were horizontally balanced (like a teeter-totter). Then either end of the log could be moved up or down almost with the touch of a finger. With the logs balanced from the middle this way, we were able to swing them into place and adjust them so that they were positioned correctly over the rebar pins provided in the pier below. Then we used guy ropes attached near the top of the support log to pull the log completely upright and tie it off securely.
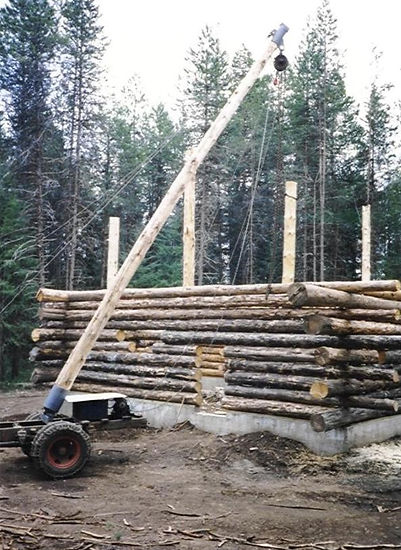
Using a chain hoist to lift a vertical pole into place and set it over the rebar pin extending from the concrete pier.
Lifting the vertical support logs over the wall with our homemade boom.

Ridge Pole and Purlins
Our ridge pole was much larger in diameter than our other logs. So, it weighed more. A lot more.
The alternative lifting method we’d planned to use originally, with temporary vertical lifting poles at each end of the ridge pole, would have made raising the ridge pole relatively easy. Our homemade boom truck method, however, now presented us with a problem. The boom was fine for lifting wall logs and our other vertical support logs, but we feared that attempting to lift the entire weight of the big ridge pole log would topple the truck. So instead, to get the ridge pole up to the highest point on the house, we decided we would need to raise it in increments. Each end was raised a short distance and held there, while we raised the other end to the same height.
The long, unfinished ends of the wall logs at each side of the house came in handy at this point. Using our homemade boom, we stepped the ridge pole up the side of the house, resting one end of the ridge pole on the extended ends of the wall logs while we lifted the other end of the ridge pole. (This same technique would also have worked if we had used the lifting method we originally planned, with temporary lifting poles described on the Log Walls page at each end of the ridge pole and purlins.)
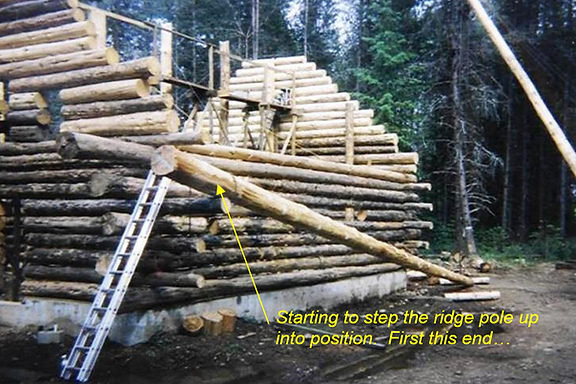

Lifting the ridge pole one end at a time.
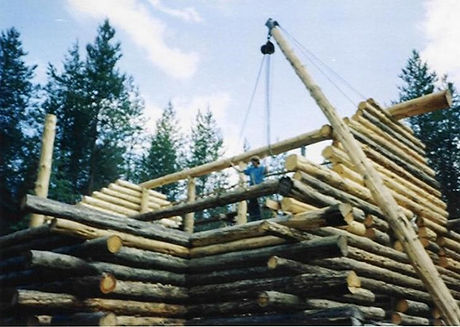
Once the ridge pole was atop the top wall log, we moved it toward the center of the house until we encountered the vertical purlin support logs. We lifted each end of the ridge pole up and over the purlin support logs and continued moving the big log toward the ridge pole support logs in the center.
Then, once the ridge pole was resting on top of the wall logs next to the ridge pole support logs, it was a simple matter to raise one end and set it down on top of the ridge pole support log at the front of the house. With the front end of the ridge pole in position, we lifted the other end of the ridge pole at the back of the house and checked to make sure that the intermediate vertical support logs were correctly positioned under the ridge pole before setting it down in place.
The ridge pole now rested in the saddles we had carved in the top of each vertical pole. To anchor it, we drilled vertically through the top of the ridge pole, a few inches into each vertical support log below, and pounded in a rebar spike.
The ridge pole rests in a saddle carved in the top of the vertical support log.

Ridge pole in place.
Each of our purlins and the smaller ridge pole over our kitchen were erected in the same manner.
Cleaning the Shell
In the process of moving our logs around while we were building, they got pretty muddy. With all the wall logs and structural logs in place, we decided this would be a good time to clean up the logs. We pressure washed the entire shell before moving on to the roof work.