Logs 'n Dogs
Foundation
"So, is this a log house, or a concrete house?"
Our foundation was complete overkill. But the foundation work came early in the process, our "ancient Rome phase", when we felt compelled to ensure the house was going to last for hundreds of years. Our arguably absurd design called for ten-inch think continuous concrete foundation walls underneath our perimeter wall logs. We had planned concrete piers for some of the internal vertical logs and could have used the same pier concept to support the entire house, with much less effort. But we didn’t. And so we had a foundation that a tank could drive over without consequence.
This page describes how we laid out and constructed our concrete footings, foundation walls and piers. A simpler method for using piers to support the perimeter of the house is sketched out on the Basics page, in case you and your building partner(s) are reasonable people.
Foundation Design
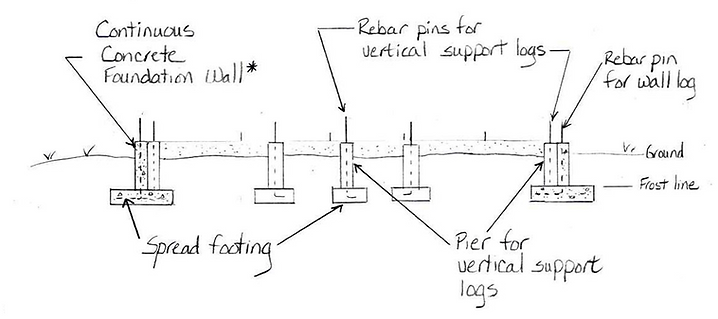
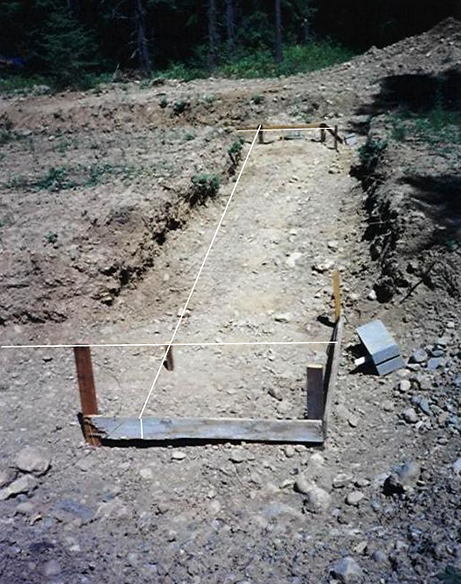
The sketches below show how the general layout we used for our home foundation. Note that piers could have been substituted for a continuous foundation wall. If piers had been used, we would have spaced them six to seven feet apart (on center).

Example Foundation Layout
Excavating
Code requirements for the depths of foundations vary regionally and depend on the depth that frost penetrates the soil in winter. Foundations that are too shallow may shift and settle over time as the ground underneath freezes and thaws each year.
We wanted the main floor of our our house to sit a few feet above the existing ground. So we excavated down approximately two feet to the base of our footings. Later, we planned to fill back these two feet, and add an additional two feet of material over the top, so that our foundation was actually four feet deep in the end. (In hindsight, yes, this was a lot of extra work.)
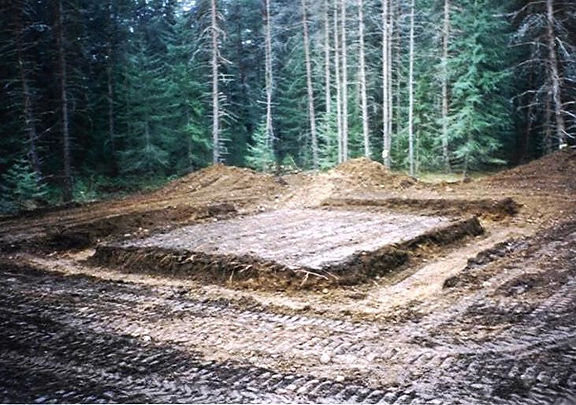
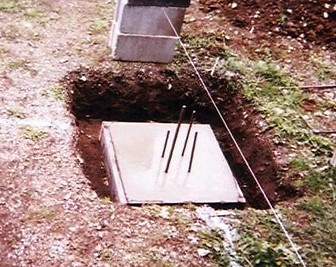
Footing area excavated.
Instead of a continuous concrete foundation, we could have used pier blocks to support the perimeter wall logs just as effectively, and much less expensively. If pier blocks were used around the perimeter, the base of each pier block would still have been below the frost line.
Laying Out the Footings, Foundations and Piers
On the inside of the house, we needed concrete piers at several locations, under the vertical poles which would support our purlins and ridge pole.
We focused first on the footing that would be built under our perimeter walls.
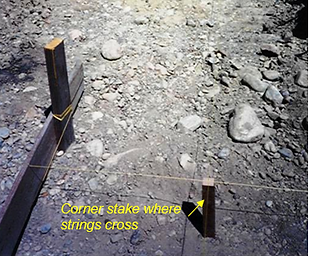
To make sure our foundation was square, we used a batter board system to lay out the corners of our house on the ground. First, we located the approximate corners of our house using a tape measure and our eyeballs. At each corner, we nailed horizontal batter boards to wood stakes that we had driven into the ground with a sledgehammer. Then we tied strings tightly between the batter boards, to mark the center of our log walls. Where the strings crossed each other at the corners would mark the house corners.
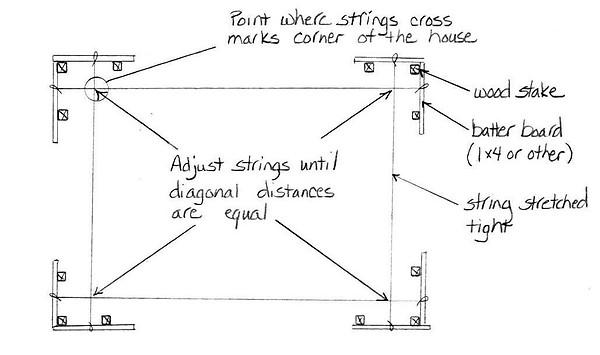
Batter Board System for Locating House Corners
Batter boards hold strings that mark the center of our future log walls. The location where the strings cross identifies a corner of the house. Once the strings were positioned so that diagonal distances between the house corners were equal, we pounded a wooden state into the ground at the corner location.
Once the strings were in place, we measured between diagonal corners and wrote down the measurements. To start with, one diagonal measurement was longer than the other, so we adjusted our strings on the batter boards slightly and measured again. We kept doing this until, by trial and error, our diagonal measurements were the same. At that point we knew the corners were square.
Since we had a small 8’ x 15’ addition on one side of our main house, we repeated this process for this area as well.
After we had the foundation wall located, we used string and a measuring tape in a similar manner to determine where our pier blocks would go to support the vertical logs on the inside of the structure.
Forming and Pouring the Concrete
Perimeter Footing Forms
We used 1x8 boards to form a footing approximately 3 feet wide around the perimeter. (And, because we were so overzealous about the sturdiness of our structure, you’ll also see that we included horizontal reinforcing bar in our footings.)
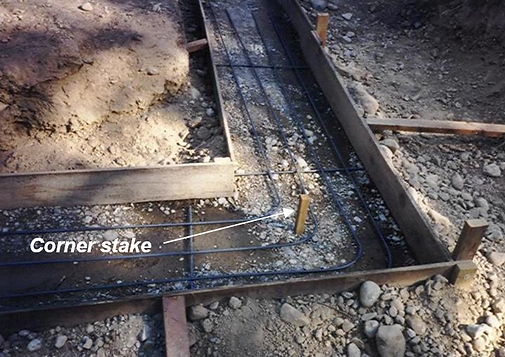
Footing forms. Note that the wooden stake placed earlier using batter board system was used as a reference point for the footings.
Pier Footing Forms
At this time, we also began work on the piers that would support our vertical logs.
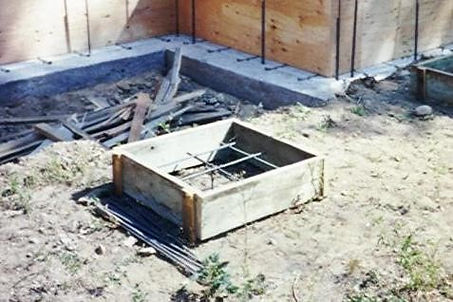
We decided to use round cardboard tube forms, about 12 inches in diameter, for our piers. But we first poured a wide (3’ by 3’) base footing for the round piers to rest on.
Pier footing form.
Alternatively, our piers could have been pyramid-shaped, without a separate footing underneath. In this case they would have been very wide at the bottom (at least 3' x 3') and at least 8" x 8" at the top.
Concrete and Rebar Rods for Footings
We poured concrete into our perimeter footing forms and also into the forms we had made for the base footings for our piers. While the concrete was still wet, we stuck long rods of #4 rebar vertically into the footings. The idea was that these rods would extend up through the foundation wall, and through holes drilled in our bottom logs, so that the perimeter log walls would be solidly anchored. We did the same thing on the footings that would support our concrete piers.
Once the concrete in the footings had hardened, we removed the wood forms from around them.

Footing after concrete has been poured and cured.
Note the long pieces of rebar extending from the top of the footing. These bars will extend through the foundation wall and ultimately through holes drilled in the first log placed on the wall.
A footing for a future concrete pier, which will support a vertical log.
Rebar sticking out of the footing will tie the footing to the concrete pier that will be poured on top. One of the bars will extend past the top of the pier and fit into a hole drilled into the end of the vertical log to pin the vertical log in place.
Forming the Foundation Walls
After our footings had cured for about two weeks, we began work on the foundation walls that would go on top of the footings.
4’x8’ sheets of plywood formed walls that were four feet tall atop the footings. We used commercially available form ties, and 2x4’s to hold the plywood up.

Foundation wall forms on top of the footings.
Once the wall forms were in place, we oiled them well (using a vegetable-based oil that we had bought in a big 5-gallon drum), so that the wood would release from the concrete later. This was important because we wanted to save money by using the same sheets of plywood to construct our roof later.

Oiling the foundation wall forms.
Pouring the Concrete Foundation Walls
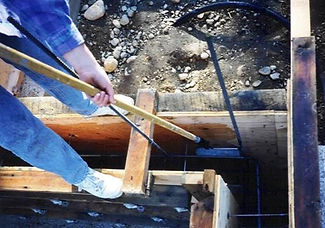
With the forms in place, we called a local concrete company and had concrete delivered to the site already mixed. As we poured the concrete into the forms, we took a long piece of rebar and tamped up and down through the wet concrete to remove air pockets.
When the concrete walls had hardened, we removed the plywood and set it aside out of the weather, to use later as roof sheeting.

Pouring the concrete foundation walls. A sacrificial piece of plywood helped funnel the soupy concrete into the forms.
Concrete foundation walls are complete atop the footing and forms have been removed.
Rebar rods originating in the footings extend up through the top of the foundation wall. Ultimately, these bars will extend through holes drilled in the first logs placed on the concrete wall.
(Concrete piers have not yet been poured on top of the interior pier footings in this photo.)

Concrete Piers for Upright Logs
We used commercially available cardboard tubes to form our 12-inch diameter concrete piers on top of the pier footings. Once again, we poured concrete into the tubes, and placed a rebar rod in the middle of each one that extended about 4-inches above the top of the pier’s concrete surface. This small length of rod that stuck out of the top of each pier served as a pin that was later inserted into the end of the vertical support log.
Foundation Insulation
Before backfilling material around our foundation walls, we placed rigid foam insulation along the inside of the concrete wall. This was to help make sure the temperature of the ground underneath the inside of the structure stayed relatively constant.
This step was important to us, since we were planning to construct a concrete slab for our main floor, with hot water tubes running through it for heat. We wanted to do everything possible to make sure our heat didn’t transfer from the floor through the ground and foundation walls.

Foundation insulation on the inside of the foundation wall.
Backfilling
Since we decided to build up the ground elevation inside the foundation to pour a floor slab on top, backfilling dirt was a considerable chore. We rented a backhoe and a compactor, and as novices, managed to scar every tree around the house in the process.
If we had chosen a simpler method and had excavated for pier blocks, backfilling around the piers could have been accomplished by hand with a shovel. Well, lesson learned.

Backfilling dirt inside the foundation walls.